 1.
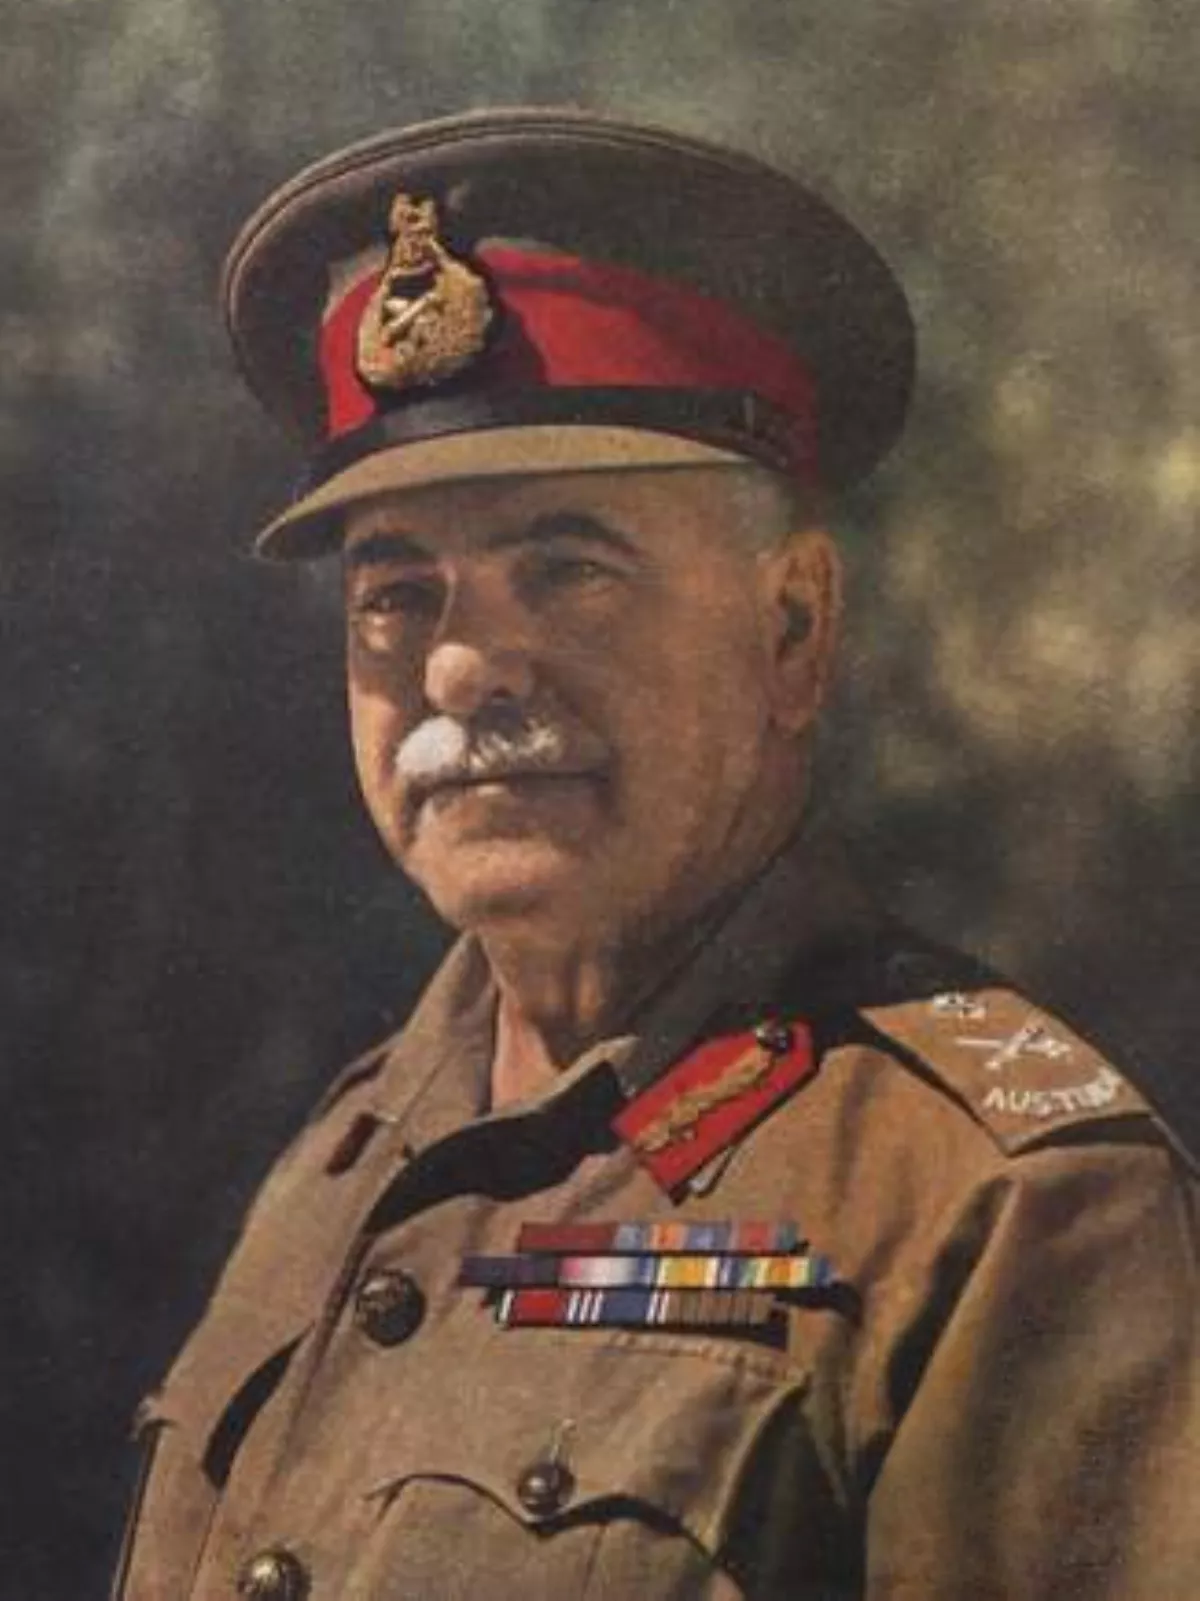
1. Field Marshal Sir Thomas Albert Blamey, was an Australian general of the First and Second World Wars.
1. Field Marshal Sir Thomas Albert Blamey, was an Australian general of the First and Second World Wars.
Thomas Blamey is the only Australian to attain the rank of field marshal.
Thomas Blamey later served on the Western Front, where he distinguished himself in the planning for the Battle of Pozieres.
Thomas Blamey rose to the rank of brigadier general, and served as chief of staff of the Australian Corps under Lieutenant General Sir John Monash, who credited him as a factor in the Corps' success in the Battle of Hamel, the Battle of Amiens and the Battle of the Hindenburg Line.
Thomas Blamey resigned from the regular Army in 1925 to become Chief Commissioner of the Victoria Police, but remained in the Militia, rising to command the 3rd Division in 1931.
Thomas Blamey attempted to protect Australian interests against British commanders who sought to disperse his forces.
Thomas Blamey was appointed deputy commander-in-chief of Middle East Command, and was promoted to general in 1941.
Thomas Blamey signed the Japanese Instrument of Surrender on behalf of Australia at Japan's ceremonial surrender in Tokyo Bay on 2 September 1945, and personally accepted the Japanese surrender on Morotai on 9 September.
The seventh of ten children, Thomas Blamey was born on 24 January 1884 in Lake Albert, near Wagga Wagga, New South Wales.
Thomas Blamey was the son of Richard Blamey, a farmer who had emigrated from Cornwall at the age of 16 in 1862, and his Australian-born wife, Margaret.
Thomas Blamey acquired the bush skills associated with his father's enterprises and became a sound horseman.
Thomas Blamey attended Wagga Wagga Superior Public School, where he played Australian football, and was a keen member of the Army Cadet unit.
Thomas Blamey began his working life in 1899 as a trainee school teacher at Lake Albert School.
Thomas Blamey transferred to South Wagga Public School in 1901, and in 1903 moved to Western Australia, where he taught for three years at Fremantle Boys' School.
Thomas Blamey coached the rifle shooting team of its cadet unit there to a win in the Western Australian Cup.
Thomas Blamey was raised in the Methodist faith and remained involved with his church.
Thomas Blamey sat the exam and came third in Australia, but failed to secure an appointment as there were no vacancies in Western Australia.
Thomas Blamey was appointed to a position in Victoria with the rank of lieutenant, commencing duty in November 1906 with responsibility for school cadets in Victoria, and was confirmed in his rank and appointment the following 29 June.
In Melbourne, Thomas Blamey met Minnie Millard, the daughter of a Toorak stockbroker who was involved in the Methodist Church there.
Thomas Blamey's first child was born on 29 June 1910, and named Charles Middleton after a friend of Blamey's who had died in a shooting accident; but the boy was always called Dolf by his family.
Thomas Blamey was promoted to captain on 1 December 1910, and became brigade major of the 12th Brigade Area.
Thomas Blamey then set his sights on attending staff college.
In 1911, Thomas Blamey became the first Australian officer to pass the entrance examination.
Thomas Blamey commenced his studies at Quetta in 1912, and performed very well, completing the course in December 1913.
Thomas Blamey was initially attached to the 4th Battalion, King's Royal Rifle Corps at Rawalpindi, and then the staff of the Kohat Brigade on the North-West Frontier.
Thomas Blamey visited Turkey, Belgium, and the battlefields of the Franco-Prussian War en route.
Fully trained staff officers were rare and valuable in the Australian Army, and while still in Britain, Thomas Blamey was appointed to the Australian Imperial Force as general staff officer, Grade 3, on the staff of Major General William Bridges's 1st Division.
Thomas Blamey was sent to evaluate the need for reinforcements by Colonel James McCay's 2nd Brigade on the 400 Plateau.
Thomas Blamey confirmed that they were needed, and the reinforcements were sent.
Near Pine Ridge, an enemy party of eight Turks approached; when one of them went to bayonet Orchard, Thomas Blamey shot the Turk with his revolver.
Thomas Blamey withdrew his patrol back to the Australian lines without locating the guns.
Thomas Blamey was always interested in technical innovation, and was receptive to unorthodox ideas.
Thomas Blamey was instrumental in the adoption of the periscope rifle at Gallipoli, a device which he saw during an inspection of the front line.
Thomas Blamey arranged for the inventor, Lance Corporal W C B Beech, to be seconded to division headquarters to develop the idea.
On 21 July 1915 Thomas Blamey was given a staff appointment as a general staff officer, Grade 2, with the temporary rank of lieutenant-colonel.
The 2nd Division Headquarters embarked for Gallipoli on 29 August 1915, but Thomas Blamey was forced to remain in Egypt as he had just had an operation for haemorrhoids.
Thomas Blamey finally returned to Anzac on 25 October 1915, remaining for the rest of the campaign.
Thomas Blamey was considered as a possible brigade commander, but he had never commanded a battalion, which was usually regarded as a prerequisite for brigade command.
Thomas Blamey was therefore appointed to command the 2nd Infantry Battalion on 3 December 1916.
Thomas Blamey was acting commander of the 2nd Brigade during a rest period from 27 August to 4 September 1917.
Thomas Blamey was sent to England where he was admitted to the 3rd London General Hospital for treatment for debilitating psoriasis on 22 September, and did not return to duty until 8 November 1917, by which time he had been promoted to brevet lieutenant-colonel on 24 September.
Thomas Blamey was made a Companion of St Michael and St George in the 1918 New Year's list, and received another mention in despatches in May 1918.
On 1 June 1918, Lieutenant General John Monash succeeded Birdwood as commander of the Australian Corps, and Thomas Blamey was promoted to the rank of brigadier general to replace White as the corps Brigadier General General Staff.
Thomas Blamey played a significant role in the success of the Australian Corps in the final months of the war.
Thomas Blamey was impressed by the capabilities of the new models of tanks and pressed for their use in the Battle of Hamel, where they played an important part in the success of the battle.
Thomas Blamey possessed a mind cultured far above the average, widely informed, alert and prehensile.
Thomas Blamey served me with an exemplary loyalty, for which I owe a debt of gratitude which cannot be repaid.
Thomas Blamey had an extraordinary faculty for self-effacement, posing always and conscientiously as the instrument to give effect [to] my policies and decisions.
Thomas Blamey arrived back in Australia on 20 October 1919 after an absence of seven years, and became director of Military Operations at Army Headquarters in Melbourne.
Thomas Blamey supported the creation of a separate air force, albeit one still subordinate to the Army and Navy.
Thomas Blamey refused to yield on his opposition to the Navy's demand that Lieutenant Colonel Stanley Goble become its first chief.
In November 1922 Thomas Blamey embarked for London to be the Australian representative on the Imperial General Staff.
Thomas Blamey became involved with the development of the Singapore strategy, and he briefed Prime Minister Stanley Bruce on it for the 1923 Imperial Conference, at which it was formally adopted.
When White retired as Chief of General Staff in 1923, Thomas Blamey was widely expected to succeed him, as he had as chief of staff of the Australian Corps in France, but there were objections from more senior officers, particularly Major General Victor Sellheim, at being passed over.
Thomas Blamey stepped up to command the 3rd Division on 23 March 1931, and was promoted to major general, one of only four Militia officers promoted to this rank between 1929 and 1939.
Thomas Blamey set about addressing the grievances that had caused the strike, which he felt "were just, even if they went the wrong way about them".
Thomas Blamey improved pay and conditions, and implemented the recommendations of the Royal Commission into the strike.
Thomas Blamey attempted to introduce faster promotion based on merit, but this was unpopular with the Police Association, and was abandoned by his successors.
Thomas Blamey introduced police dogs, and increased the number of police cars equipped with two-way radios from one in 1925 to five in 1930.
Thomas Blamey boosted the numbers of policewomen on the force.
Thomas Blamey became involved in his first and greatest scandal soon after taking office.
Thomas Blamey later said that he had given his key ring, which included his badge, to a friend who had served with him in France, so that the man could help himself to some alcohol in Thomas Blamey's locker at the Naval and Military Club.
Thomas Blamey's story was corroborated by his friend Stanley Savige, who was with him at the time.
Thomas Blamey protected the man in question, who he said was married with children, and refused to identify him.
Thomas Blamey took the position that it was the job of the police to enforce the laws, even if they did not support them.
Almost as controversially, Thomas Blamey drew a sharp distinction between his personal life and his job.
Thomas Blamey was knighted in the 1935 New Year Honours, and in 1936 he was appointed a Commander of the Venerable Order of Saint John.
Thomas Blamey reluctantly submitted his resignation on 9 July 1936.
From March 1938 Thomas Blamey supplemented his income by making weekly broadcasts on international affairs on Melbourne radio station 3UZ under the pseudonym "the Sentinel".
Thomas Blamey was appalled at Nazi Germany's persecution of Jews, and saw a clear and growing menace to world peace from both Germany and the Empire of Japan.
Thomas Blamey was leader of the clandestine far-right League of National Security, known as the "White Army", described as a fascist paramilitary group.
In November 1938, Thomas Blamey was appointed chairman of the Commonwealth Government's Manpower Committee and Controller General of Recruiting.
Thomas Blamey headed a successful recruiting campaign which doubled the size of the part-time volunteer Militia from 35,000 in September 1938 to 70,000 in March 1939.
Two other officers, Major Generals Gordon Bennett and John Lavarack, were considered, and had strong and well-connected supporters, but unlike Thomas Blamey they were public critics of the government's defence policies.
On 13 October 1939, a month after the outbreak of the Second World War, Thomas Blamey was promoted to lieutenant general, and appointed to command the 6th Division, the first formation of the new Second Australian Imperial Force, and received the AIF service number VX1.
Thomas Blamey selected Brigadier Edmund Herring to command the 6th Division artillery, Colonel Samuel Burston for its medical services, and Lieutenant Colonels Clive Steele and Jack Stevens for its engineers and signals.
Thomas Blamey took Rowell with him as his corps chief of staff, and picked Major General Henry Wynter as his administrative officer.
Thomas Blamey flew to Palestine on a Qantas flying boat in June 1940.
Thomas Blamey refused to allow his troops to perform police duties in Palestine, and established warm relations with the Jewish community there, becoming a frequent guest in their homes.
Thomas Blamey was not inflexible, and permitted Australian units to be detached when there was a genuine military need.
Thomas Blamey refused on the grounds that the brigade was not yet fully equipped, but eventually compromised, sending it on the understanding that it would soon be joined by the rest of the 6th Division.
Thomas Blamey has been criticised for allowing this when he knew it was extremely hazardous, after he was told that Menzies had approved.
Thomas Blamey insisted on sending the veteran 6th Division first instead of the 7th Division, resulting in a heated argument with Wavell, which Blamey won.
Thomas Blamey was under no illusions about the odds of success, and immediately prepared plans for an evacuation.
Thomas Blamey was promoted to the same rank on 24 September 1941, becoming only the fourth Australian to reach this rank, after Monash, Chauvel and White.
Thomas Blamey would spend the rest of the year attempting to reassemble his forces.
Thomas Blamey was Mentioned in Despatches for the eighth time, and was awarded the Greek War Cross, First Class.
Thomas Blamey's Allied Land Forces Headquarters was established in Melbourne, but after MacArthur's General Headquarters moved to Brisbane in July 1942, Thomas Blamey established an Advanced LHQ in nearby St Lucia, Queensland.
Thomas Blamey felt he had no choice, but his assumption of command of New Guinea Force sat uneasily with Rowell, the commander of I Corps there, who saw it as displaying a lack of confidence in him.
Five days later, Thomas Blamey replaced Allen as the 7th Division's commander with Vasey.
Thomas Blamey cancelled Chester Wilmot's accreditation as a war correspondent in October 1942 for spreading a false rumour that Thomas Blamey was taking payments from the laundry contractor at Puckapunyal.
Wilmot was reinstated, but on 1 November 1942, Thomas Blamey again terminated Wilmot's accreditation, this time for good.
Thomas Blamey made a controversial speech to the 21st Infantry Brigade on 9 November 1942.
Thomas Blamey added that it was like shooting rabbits: while the rabbits were in their burrows they could not be shot; they had to be got on the run and then the man with the gun could get them.
Thomas Blamey was direct with them and said that a few officers in the brigade had failed.
Thomas Blamey was impressed by the strength of the Japanese fortifications that had been captured, later telling correspondents that Australian and American troops had performed miracles.
At the Battle of Wau in January 1943, Thomas Blamey won the battle by acting decisively on intelligence, shifting the 17th Infantry Brigade from Milne Bay in time to defeat the Japanese attack.
The relationship between MacArthur and Thomas Blamey was generally good, and they had great respect for each other's abilities.
MacArthur's main objection was that as commander-in-chief of AMF as well as commander of Allied Land Forces, Thomas Blamey was not wholly under his command.
Thomas Blamey was ordered to again assume personal command of New Guinea Force.
Thomas Blamey's plan called for the use of the landing craft of the 2nd Engineer Special Brigade, and he intended to cross the Markham River with the aid of paratroops.
Thomas Blamey attempted to acquire helicopters, but met resistance from the RAAF, and they were never delivered.
MacArthur accepted a number of changes that Thomas Blamey made to his strategy, probably the most notable of which was putting the landing on New Britain before Thomas Blamey's attack on Madang.
Thomas Blamey then handed over command of New Guinea Force to Mackay and returned to Australia.
Thomas Blamey responded to a request from Mackay to relieve Herring, whose chief of staff had been killed in an aircraft accident.
In February 1944 there was criticism in Parliament of the way that Thomas Blamey had "side tracked" various generals; the names of Bennett, Rowell, Mackay, Wynter, Herring, Lavarack, Robertson, Morshead and Clowes were mentioned.
Thomas Blamey was annoyed by the media campaign run against him by William Dunstan and Keith Murdoch of The Herald and Weekly Times newspaper group, but success in New Guinea led to a change of heart at the newspaper, and Thomas Blamey even accepted a dinner invitation from Murdoch in 1944.
Thomas Blamey took the advice of Edward Ford and Neil Hamilton Fairley, and strongly backed their ultimately successful efforts to control the disease.
Thomas Blamey was involved in discussions with the government over the size of the Army to be maintained.
Thomas Blamey pressed for a commitment to maintain three AIF divisions, as only they could legally be sent north of the equator where the final campaigns would be fought.
Thomas Blamey urged that the Empire Air Training Scheme be curtailed, and opposed MacArthur's proposal to use the Australian Army primarily for logistic support and leave combat roles principally to American troops.
The rowdy goings-on in Thomas Blamey's cabin did not endear him to the Prime Minister, who was a reformed alcoholic.
The party travelled by train to Washington, DC, where Thomas Blamey was warmly greeted by the Joint Chiefs of Staff, and briefed the Combined Chiefs of Staff on the progress of the war in SWPA.
In London Thomas Blamey had a series of meetings with the Chief of the Imperial General Staff, Field Marshal Sir Alan Brooke, and was briefed on Operation Overlord by General Sir Bernard Montgomery and Air Chief Marshal Sir Arthur Tedder.
Thomas Blamey was disappointed to have to turn down an offer to accompany the invasion as a guest of General Dwight Eisenhower because Curtin feared that the invasion would lead to retaliatory German bombing, and wanted to be far away before it started.
Thomas Blamey vigorously defended his aggressive policy to reduce the bypassed Japanese garrisons and free the civilian population, but some felt that he went too far in putting his case publicly in a national radio broadcast.
Thomas Blamey was criticised for not spending enough time in forward areas, although he spent more than half his time outside Australia in 1944, and between April 1944 and April 1945 travelled 105,000 kilometres by air, 11,000 kilometres by sea and 12,100 kilometres by land.
Thomas Blamey urged that the 7th Division not be sent to Balikpapan, an operation that he regarded as unnecessary.
Thomas Blamey then flew to Morotai and personally accepted the surrender of the remaining Japanese in the South West Pacific.
Thomas Blamey insisted that Australia should be represented in the Allied occupation of Japan.
MacArthur abolished SWPA on 2 September 1945, and on 15 September Thomas Blamey offered to resign.
Thomas Blamey was given time to write up his despatches, and was formally retired on 31 January 1946.
Thomas Blamey returned to Melbourne, where he devoted himself to business affairs, to writing, and to promoting the welfare of ex-service personnel.
In September 1948, Thomas Blamey paid a visit to Japan, where he was warmly greeted on arrival at Iwakuni by Horace Robertson, the commander of the British Commonwealth Occupation Force, who provided an RAAF honour guard.
MacArthur sent his own aircraft, the Bataan, to collect Thomas Blamey and bring him to Tokyo, where he met Thomas Blamey at the airport and gave him another warm greeting.
Thomas Blamey was the head of the organisation until ill health forced him to stand down in favour of Morshead in 1950.
Menzies became prime minister again in December 1949, and he resolved that Thomas Blamey should be promoted to the rank of field marshal, something that had been mooted in 1945.
The King's Official Secretary, Sir Alan Lascelles, then claimed that Thomas Blamey could not be promoted to field marshal because he was a retired officer, which was not true.
Thomas Blamey was duly promoted to field marshal in the King's Birthday Honours of 8 June 1950.
Thomas Blamey is the only Australian to attain the rank of field marshal.
Thomas Blamey died there of hypertensive cerebral haemorrhage on 27 May 1951.
Thomas Blamey's body lay in state at the Shrine of Remembrance, where 20,000 people filed past.
Thomas Blamey's body was cremated at the Fawkner Crematorium and Memorial Park.
Thomas Blamey is honoured in Australia in various ways, including a square named after him which is situated outside the Russell Offices headquarters of the Australian Defence Force and Department of Defence in the national capital, Canberra.
Controversially, the statue portrays Thomas Blamey clutching half of a Jeep windscreen, rather than mounted on the traditional horse or simply standing.
Thomas Blamey's papers are held in the Australian War Memorial, where his field marshal's baton is on display.